
Every property and Starlink project is different. This guide explains the practical factors considered during professional installation and helps you prepare informed questions before work begins.
What an additional mesh node actually does
A Starlink mesh node extends the indoor Wi-Fi network created by the primary Starlink router. It does not increase the speed arriving from the satellites, remove dish obstructions, or create additional internet capacity. Its job is to give phones, televisions, computers, cameras, and other devices a closer Wi-Fi access point in parts of the building where the primary router's signal is usable but weak.
The distinction matters when diagnosing a problem. If the Starlink app reports outages or obstructions, correct the dish-side problem first. If internet performance is strong next to the primary router but weak in distant rooms, a mesh node may be appropriate. Use the Advanced Speed Test when available to compare router-to-internet performance with device-to-router performance before buying more hardware.
Confirm equipment compatibility before setup
Starlink has produced several router and dish generations, and equipment that looks similar is not automatically compatible. Check the Starlink app, the label on the router, the kit generation, and the current Starlink support material for your specific hardware before purchasing a node. The safest approach is to use a Starlink mesh router or node explicitly identified as compatible with the primary router already serving the property.
Do not assume that a used node is ready to pair. Equipment tied to a different setup may need to be factory reset, and damaged power cables or an incomplete used package can prevent installation. If the property uses a third-party router in bypass mode, the Starlink-native mesh workflow may not apply; expansion would normally be handled within that third-party networking system instead.
Choose the location before plugging it in
The best mesh location is between the primary router and the weak-coverage area—not at the farthest point where Wi-Fi has already disappeared. A wireless node must receive a dependable signal before it can repeat that connection effectively. Think of the node as a relay station: it cannot forward a strong connection that never reaches it.
Begin roughly halfway toward the problem area, then account for the building. Dense masonry, concrete, metal siding, foil-backed insulation, large appliances, utility rooms, mirrors, aquariums, fireplaces, and several walls in a row can weaken the link. An open hallway, stair landing, or elevated shelf often performs better than a closed cabinet, floor-level outlet, or room behind major obstructions.
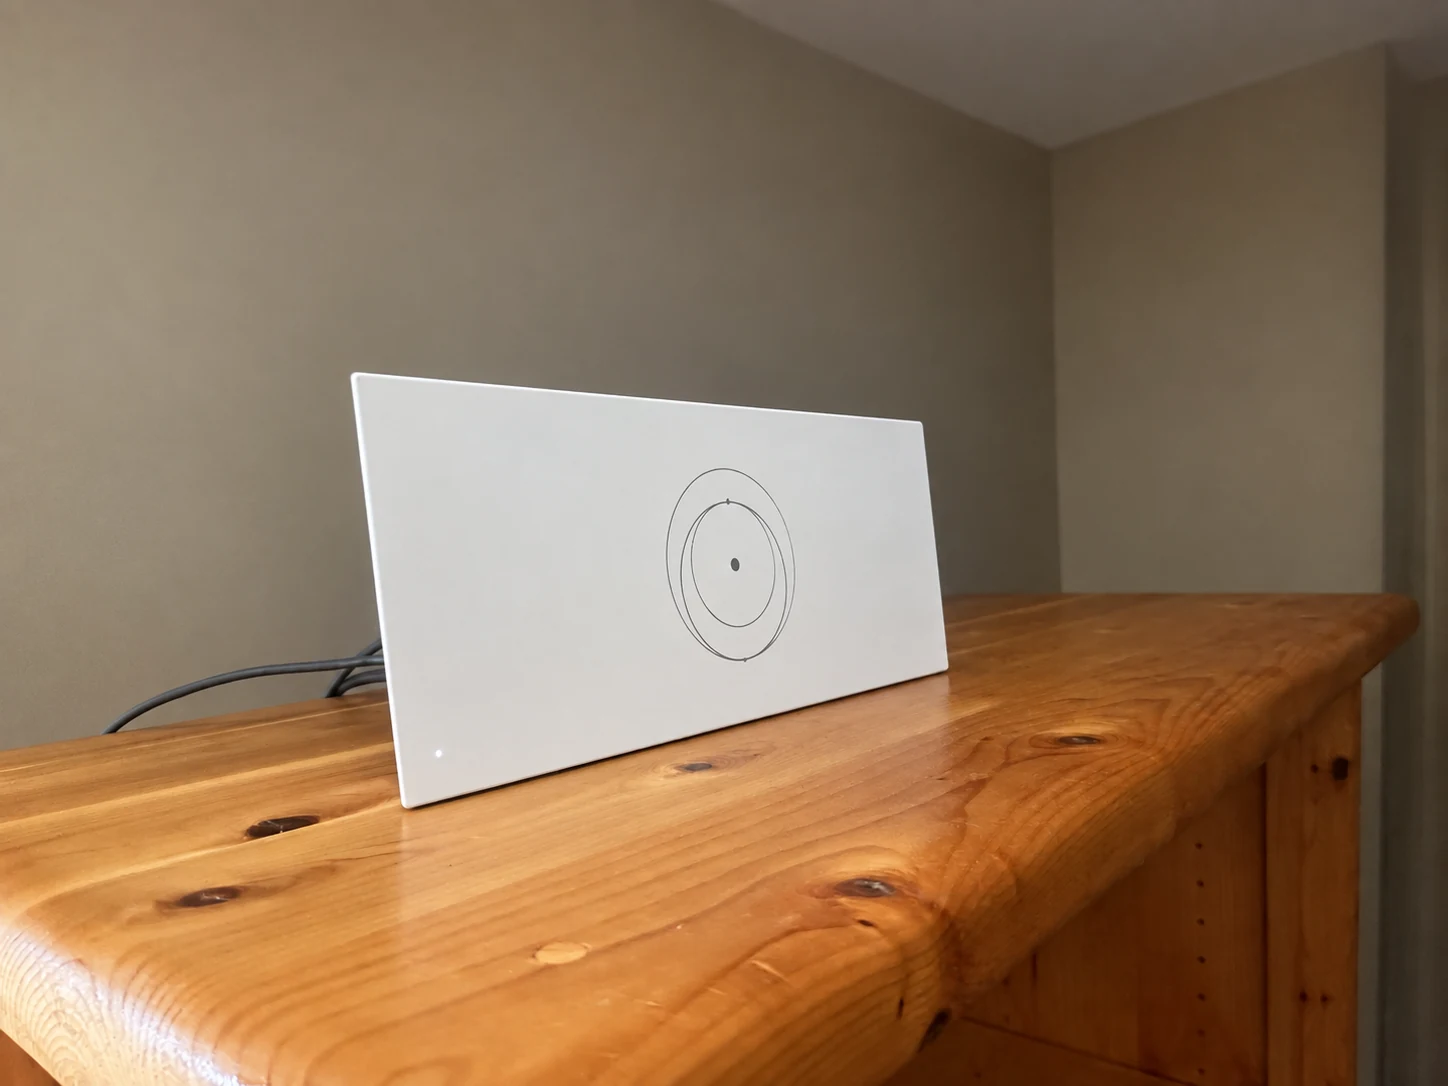
The router sits on a cabinet in the living space. Use room-by-room testing to decide whether this location provides the coverage your household needs.
Installation and photo: Mann's Starlink Contracting · Retouched for presentation · View original field photo ↗Prepare the primary Starlink network
Before adding hardware, confirm that the primary Starlink router is online and that a phone can connect through the Starlink app. Update the app, verify that the existing network name and password work, and temporarily disable a phone VPN if it prevents local network discovery. Bluetooth and local-network permissions may also be required by the phone during setup, depending on the app version and operating system.
Perform the first pairing reasonably close to the primary router. You can move the node to the planned location after it joins successfully. This separates pairing trouble from placement trouble and makes it easier to determine whether the node, power, app, or distance is causing the problem.
Power and pair the new mesh node
Connect the additional node to reliable power and allow it time to start. Stay connected to the existing Starlink Wi-Fi network, open the Starlink app, and watch for a prompt indicating that a new mesh node or Starlink router is ready to pair. Accept the pairing request and keep the app open while the equipment joins and receives its configuration.
App labels can change over time, so the exact wording may differ. Some versions place mesh management under Network, Router, or Devices. The important signs are that the new node appears within the existing Starlink network and does not create an unrelated second Wi-Fi name. Pair one new node at a time so each addition can be identified, named, placed, and tested before the next one is introduced.
Do not repeatedly unplug the node during its initial startup. Firmware updates or network synchronization can make the process take longer than an ordinary router reboot. If the app confirms the node has joined, give the system a few minutes to stabilize before judging performance.
Move the node to its permanent position
After successful pairing, unplug the node, move it to the planned location, reconnect power, and allow it to rejoin. Check the app for the quality of the connection between the primary router and the node. If the app reports a weak link or devices remain slow, move the node closer to the primary router or into a more open line through the building.
A node placed beside the primary router adds little useful coverage. A node placed inside the dead zone may broadcast a visible Wi-Fi signal but still have a poor path back to the internet. The useful position is the overlap where the primary signal remains healthy and the node can reach farther into the building.
Need help with this on your Starlink system?
Mann's Starlink Contracting provides owner-installed service throughout Kentucky and an 11-state region.
Add a second or third node deliberately
Additional nodes should solve separate, measured coverage problems. Do not distribute routers evenly through the house merely because outlets are available. Map the weak rooms, identify which node has the strongest upstream connection, and avoid forcing several wireless hops when a simpler placement would work.
In a multi-level home, a stairwell or vertically aligned open area can provide a better path than placing nodes at opposite ends of different floors. In a long home, stagger nodes through open transition areas. Too many nodes crowded together can add wireless competition without improving usable coverage, so test after every addition.
Test coverage instead of relying on signal bars
Walk through the intended coverage areas with the same phone or laptop and run several practical checks. Confirm that webpages load, video starts reliably, calls remain stable, and the device transitions between access points without losing the network. Run speed tests near the primary router, beside each node, and in the rooms that originally had trouble.
Compare results rather than chasing one peak number. A distant room that becomes stable at a moderate speed may represent a successful mesh installation even if it does not match the speed beside the primary router. Wireless mesh uses part of its radio capacity to communicate between nodes, and every wall, floor, and hop can affect the result.
Troubleshoot a node that will not pair
First confirm that the phone remains connected to the primary Starlink Wi-Fi and that the node has steady power. Move the node into the same room as the primary router, close and reopen the app, and allow additional startup time. Check the app and account for alerts, pending updates, or an offline primary router.
If the node was previously used, factory-reset it using the procedure for that exact model, then attempt pairing again. Reset methods differ among router generations; repeatedly power-cycling the wrong hardware without checking the model can create more confusion. If pairing still fails, verify compatibility and contact Starlink Support with the router model, node model, app screenshots, and the troubleshooting already completed.
Troubleshoot a node that pairs but performs poorly
A paired node with slow or unstable service usually points to placement or wireless conditions. Move it closer to the primary router, raise it above furniture, remove it from a cabinet, and keep it away from large metal objects and appliances. Test with the node in a temporary open location before committing to a permanent wall mount.
Also separate Wi-Fi performance from Starlink service performance. If every device—including one beside the primary router—is slow, adding nodes is unlikely to correct the cause. Review dish obstructions, outages, cable condition, weather, network demand, and the primary router before expanding the mesh.
Know when wireless mesh is not the right solution
A detached garage, barn, workshop, metal building, or distant guest house may be beyond the practical reach of ordinary indoor wireless mesh. Outdoor distance, exterior walls, metal construction, and weather exposure can make a point-to-point wireless bridge, properly installed Ethernet or fiber, and a separate indoor access point more dependable.
Likewise, large commercial properties may need managed networking, wired backhaul, multiple access points, or professional channel planning rather than a chain of wireless nodes. Starlink supplies the internet connection, but the internal network should be designed for the size, construction, device count, and reliability requirements of the property.
Finish with a clean, serviceable installation
Once placement is proven, keep each node upright or mounted as designed, with airflow around it and the power cable protected from pets, furniture, vacuums, and foot traffic. Label nodes by location in the app if that option is available. Record which rooms each one serves so future changes are easier to diagnose.
Re-test after major furniture changes, remodeling, or moving the primary router. A mesh system is not a one-time promise of identical speed everywhere; it is a planned set of wireless links. Careful compatibility checks, deliberate placement, and testing after each node produce a more reliable result than simply adding more hardware.
Get a personal installation estimate.
Send your location and project details. Caleb will discuss your equipment and mounting needs, then confirm your complete quote before scheduling.
Questions first? Call Caleb directly at 270-940-4866.
Written byCaleb MannOwner and installer at Mann's Starlink Contracting. Caleb works directly with customers from project planning through final system setup.
